#enable and configure always on display
Explore tagged Tumblr posts
Visit Tumblr Blog
Explore Tumblr blogs with no restrictions, modern design and the best experience.
Last Seen Tumblr Blogs


Fun Fact
The Tumblr app for Google Glass was released on May 16, 2013.
Link
How To Enable Always On Display On Android Phone, How to enable and configure Always On Display on Xiaomi phones
0 notes
Text
How to record videos with Sims 2 in-game camera (HD, no UI, no lag, no file format issues)
I originally planned to include this information in the behind-the-scenes video about Bring Me To Life that I'm currently working on, but it's overly technical and not that interesting. It still might be useful to some people (mostly machinima creators), so I decided to make a separate post about it.
There are two ways to record videos in The Sims 2:
Using screen recording software
This is the most common and probably the easiest way. You just need a program like OBS that will capture whatever happens on your screen exactly as it happened. If this method works for you, it's perfectly fine. No need to follow this guide then.
Using the in-game video capture tool
This way involves capturing videos directly in the game by clicking the video camera icon or pressing V on your keyboard. This method is perfect for machinima creators. It automatically hides the UI, but more importantly, the video will always be perfectly smooth, regardless of the actual performance of your game, i.e. even if it runs like a literal slide show, any videos you capture this way will look perfectly fine.
Okay, so if this method is so great, why do we need a tutorial for it? Well, as is usually the case with this game, the feature works fine, it's just a little bit outdated.
To fix it, we need to do 3 simple* things.
*If you're a Sims 2 player, you're probably used to this kind of stuff anyway
Step 1: Installing a modern codec
In the Camera settings, the game lets you choose if you want the videos to be compressed. I highly recommend choosing that option, as uncompressed videos take up way too much storage space.
The codec that the game uses to handle compression is outdated and most video editing programs will not be able to edit such files. To fix this problem, we need to download and install x264vfw, which is a free an open source codec.
Once installed, open the Configure x264vfw app. No need to change anything there (unless you want to test different settings of course), except for this one small thing:
In the Debug section, go to Log level and change it to None. Otherwise the codec will display a pop-up window each time you record in the game, which is pretty annoying.

Step 2: Making the game use the codec
Locate the VideoCapture.ini file in the installation folder with your latest expansion pack. I have Ultimate Collection, so for me the path looks like this:
D:\Program Files (x86)\Origin Games\The Sims 2 Ultimate Collection\Fun with Pets\SP9\TSData\Res\UserData\Config
Back up your file and open the original version with Notepad. You can either replace the whole thing with my settings, or just update the highlighted parts.
While you're at it, make sure to update the LargeSettings value to 1920x1080 so that the videos are captured in HD (no need to worry about it if you're copying the whole thing):
[Config] PreferredCodec=x264vfw Folder is relative to Res/Userdata Folder=Movies FilenameBase=movie NoFillFrames=0 AudioStereoOutput=0 AudioRateDivisor=4 GlobalSettings = reset, vbr:1, fps:10, keyinterval:30, mode:1, datarate:0 SmallSettings = size: 128x128 MediumSettings = size: 320x240 LargeSettings = size: 1920x1080 LowQualitySettings = minq: 6, maxq: 16, mode:0 MediumQualitySettings = minq: 4, maxq: 10, fps:15, mode:0 HighQualitySettings = minq: 2, maxq: 8, fps: 30, keyinterval: 60 SmallLowSettings = datarate: 75 SmallMediumSettings = datarate: 150 SmallHighSettings = datarate: 300 MediumLowSettings = datarate: 150 MediumMediumSettings = datarate: 300 MediumHighSettings = datarate: 600 LargeLowSettings = datarate: 300 LargeMediumSettings = datarate: 600 LargeHighSettings = datarate: 1200 AllowAntialiasing=0 # some drivers have issues with capture when AA is enabled [Codecs] 0=VP61 # On2 VP6.1 1=VP62 # On2 VP6.2 2=VP60 # On2 VP6.0 3=x264vfw # x264vfw
Save your file.
When in game, go to Camera Options and make sure Video Capture Size is set to Large and Video Quality is set to High.
Also, you might want to change the Maximum Video Recording Time to something higher than 60 seconds.

Credit for this solution goes to this person who left the following comment under this video
Step 3: Changing the file format from avi to mp4
Before doing this step, test if everything works correctly when you try to capture videos in the game. The videos will go to the Movies folder in your Documents folder for TS2.
Try to import the videos into your editing software. If it doesn't work, e.g. the program does not recognize the file or the file appears to be corrupted, you'll need to change the file format from avi to mp4.
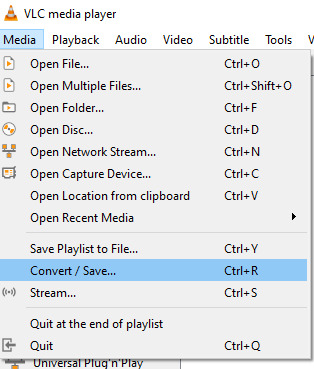
I personally use VLC media player for that, as it's free and open-source.
Go to Media > Convert / Save...
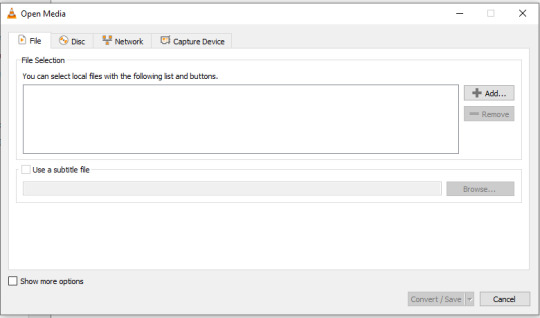
Drag your files into the File Selection section or select them by clicking the + Add button.
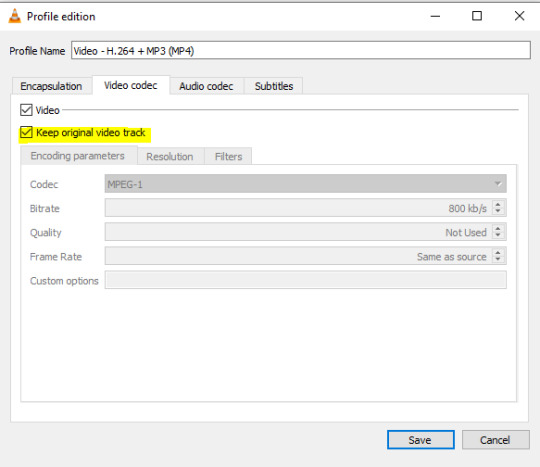
Select the Video - H.264 + MP3 (MP4) profile and click the wrench icon to edit its settings.

In the Video tab, make sure to check the box next to Keep original video track. Go to the Audio tab and check the analogous box.
Save and in the next window specify the destination folder and click Start. VLC will go through each of the files you added.
IMPORTANT:
While Steps 1 and 2 only need to be done once, Step 3 needs to be done for every new video you record (unless, your video editing software doesn't struggle opening the avi files). The good news is, this step is really fast, no more than a second per a single video. This is because we're keeping the original video track intact. The only thing that is changed is the container. That's why this change is fast and does not affect video quality in any way. Ideally, this step wouldn't be needed if we figured out a way to force the game to use mp4 when saving those videos, but I'm not sure if this is possible.
Like I said, outside of machinima creation, it probably makes more sense to just record your screen with OBS. Especially if you want to capture videos in 4K, which I don't think would be possible with this method. But it works for me and as it took me a while to figure it all out, I just wanted to share all the info in a single post!
#sims 2 machinima#ts2#sims2#sims 2 tutorial#ts2 tutorial#sims 2 guide#ts2 guide#my stuff#ts2 simblr#machinima#ts2 machinima
11 notes
·
View notes
Text
How to Enable Auto-Sync Photos from Dropbox to WordPress?
Managing media files and keeping them organized on your WordPress website can be a daunting task. Dropbox users can now simplify this process with the powerful File Manager for Dropbox (Integrate Dropbox plugin), which allows seamless auto-synchronization of your Dropbox folders with your WordPress site. Whether you're uploading photos, videos, or documents, this plugin ensures your content is always up-to-date and easily accessible. Here’s how you can get started:
What is Integrate Dropbox?

File Manager for Dropbox (Integrate Dropbox) is a WordPress plugin designed to sync your Dropbox content directly to your WordPress pages, posts, or media library. This plugin makes it easy to:
Upload images, videos, or files from Dropbox to your WordPress site.
Auto-sync shared folders for real-time updates.
Showcase Dropbox content on your website without the hassle of manual uploads.
By automating the synchronization process, Integrate Dropbox saves time and improves efficiency for bloggers, photographers, businesses, and anyone managing a WordPress site.
Who Benefits from the Integrate Dropbox Plugin?
Photographers: Automatically sync and display photo albums on your portfolio site.
Content Creators: Keep your website updated with the latest files, presentations, or videos.
Businesses: Share brochures, product catalogs, and documents seamlessly with your clients.
Using the Integrate Dropbox Plugin, you can seamlessly upload photos to your website in real time by creating a Dropbox folder and embedding it on your site using a shortcode. This functionality is perfect for events like photo booths at Christmas or New Year’s parties, where you want the latest uploads to be visible instantly.
How to Auto-Sync Photos from Dropbox to WordPress
youtube
Step 1: Install and Activate the Integrate Dropbox Plugin
Download and install the Integrate Dropbox Plugin from the WordPress Plugin Directory.
Activate the plugin from the Plugins section of your WordPress Dashboard.
youtube
Step 2: Connect Your Dropbox Account
Go to Settings > Integrate Dropbox in your WordPress admin panel.
Click Connect Dropbox Account.
Authorize the connection by logging in to Dropbox and allowing the app access.
Step 3: Create a Dropbox Folder for Uploads
Log in to your Dropbox account.
Create a new folder named, for example, Event Photos.
Share the folder with your event team or photographers, allowing them to upload photos in real time.
Step 4: Sync the Dropbox Folder with Your Website
In your WordPress dashboard, navigate to the Integrate Dropbox section.
Click Shortcode Builder and select Gallery or Slider Carousel module.
Choose the Dropbox folder (Event Photos) you created earlier.
Customize display settings like layout, style, and auto-refresh interval.
Copy the generated shortcode.
Why Use the File Manager for Dropbox Plugin?
Here are a few reasons why Dropbox users find this plugin invaluable
Effortless Media Management: Say goodbye to manually downloading files from Dropbox and re-uploading them to WordPress. With auto-sync, your Dropbox content is always mirrored on your site.
Real-Time Updates: Any changes made in your Dropbox folder are automatically reflected on your WordPress site. This feature is particularly useful for shared folders, ensuring collaboration is seamless.
Streamlined Image and Photo Uploads: Photographers and content creators can easily showcase their work by syncing their image folders directly to WordPress. No need for duplicate uploads or tedious file management.
Embed Dropbox Content: Display Dropbox files in a visually appealing format on your WordPress posts and pages, perfect for portfolios, galleries, or downloadable resources.
Customizable Settings: Configure folder synchronization, access permissions, and display preferences to meet your specific needs.
Wrapping Up
File Manager for Dropbox plugin simplifies your workflow and eliminates the hassle of manual uploads, making it the perfect solution for Dropbox users who rely on WordPress. To learn more about this plugin and its features, visit the plugin directory or explore the settings after installation.
Start syncing your Dropbox folders today and elevate your WordPress site to the next level!
5 notes
·
View notes
Text
Capturing the ambience of Gears of War (2006)
The original Gears maps have stylized yet beautiful look that still holds up today. This guide will look at the abandonware 2007 Windows release, and the 2006 Xbox 360 original, rather than the remastered Ultimate Edition.

Obtaining the game
If you’re only concerned with capturing the multiplayer maps, you can download the standalone AI Bot version of Gears (it’s also great fun!). For vanilla versions of the game, check out pinned messages in the Gears PC Community discord. Refer to PCGamingWiki for troubleshooting on getting the game running.
Extracting sounds
Use umodel to extract UPKs in Gears’s Sounds directory e.g. G:\Microsoft Games\Gears of War\WarGame\CookedPC\Sounds.
Enabling console commands
Inside your WarInput.ini file:
[Engine.Console] ConsoleKey=Tilde TypeKey=Tilde MaxScrollbackSize=1024 HistoryBot=-1 bEnableUI=True
This will enable the console, with history and output display included.
Capturing footage
Open your console, and use TOGGLEUI command to hide the HUD. ghost and walk will toggle between free camera mode and normal player control, respectively.
You can also load into a given map with open or servertravel, e.g. open <map name e.g. mp_gridlock>. We can specify a Game argument to enter with freecam* mode e.g. open <map name e.g. mp_gridlock>?Game=WarfareGameContent.WarGameFreeCam.

You can also activate spectator mode inside the editor (see below) by holding Ctrl and pressing the playtest button. However I found this only offered a window display, and there were rendering artifacts on some maps.

*I found on some versions of the game, open loads maps with player-character control, while others loaded into a free-camera mode. I believe this has something to do with Debug vs Retail versions but I'm not sure.
Identifying sounds
By passing certain launch options, we can open the game’s editor to inspect how sounds are configured on each map. Example shortcut:
"G:\Microsoft Games\Gears of War\Binaries\Startup (No-Cd).exe" editor -cookededitor -installed
To find each map's random ambient audio events, open the Kismet panel:
Click Level tab in main browser window2. K -> button on the level box
These random sounds emit from a set of target objects on the map, using the options visible in the event’s panel (e.g. below, volume of 0.25 and pitch of 1.0).

We can also use the LISTSOUNDS and LISTWAVES console commands during gameplay to see which sounds are loaded and currently playing respectively. The latter also shows the sound’s current playback volume.

Always take care to note each sound’s configured pitch in the Editor, as it can vary! Indeed, you’ll find that Gears’s maps create their immersive soundscapes by permuting the position and pitch of only a small number of assets.
New Hope project
This is an ambitious mod for Gears 1 which may make the above easier.
Xbox 360 version
The Windows version's presentation differs slightly from this original. Access free camera mode by using Heebo's tools.
If you can't get these working, be sure you are running the required version of Xenia Canary. Also enable all Extra Custom Types, and enable MEM_MAPPED in Scan Settings.
Putting it all together
Combine your static positional sounds, randomized Kismet sounds, and captured footage using an editor like Shotcut.

4 notes
·
View notes
Text


2023
Ice Age 2 The Meltdown game.
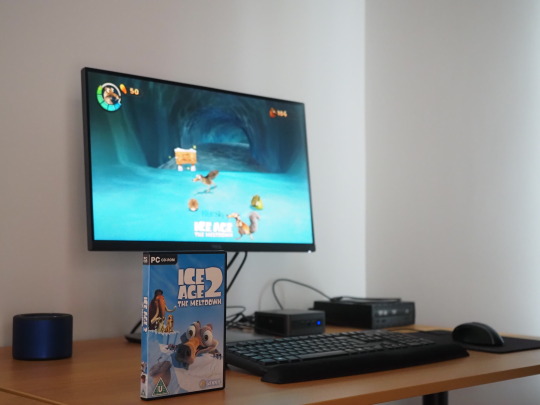
On the 31st July 2023, I installed Ice Age 2: The Meltdown onto my system to test-run it on Microsoft's Windows 11.
I connected a portable Liteon DVD-ROM optical drive to my Mini-PC to install it using the 2 CD discs.
Here is a picture of me with the game box!
Ice Age 2: The Meltdown, based on Blue Sky Studios 2006 film of the same name, was developed by Eurocom and published by Vivendi Universal Games (Sierra Entertainment).
The game works on the latest versions of Windows and also works on Linux using Wine (PlayOnLinux).
I put Disc 1 in first and opened the auto-run from the disc. I clicked the 'Install Ice Age 2: The Meltdown' option from the list. The game uses InstallShield software to install itself onto Windows. I switched the discs around towards the end of the install. Once it had finished installing onto the system, I chose to launch the game.
After going through the intros, I pressed the enter key to go to the main menu. Firstly before starting the game, I configured my favourite keyboard layout. Afterwards I then started a new game and selected a save game slot (Slot A).
As I was playing Ice Age 2, I got to the Forest 2 stage, shortly after going through this stage, Windows 11 asked if I wanted to run the game in 'Compatibility Mode', I chose to run the game with this. It offered this as it knew the game application running was intended for an older version of Windows. However compatibility mode didn't work and the game crashed to the desktop.
The app process name for the game is 'IceAge2pc.exe' (32-bit) when running. The CD (Disc 1) is required to play the game.
I re-launched the game and had to re-configure everything and start from the beginning again, however the game seemed to work much better without running it in the legacy mode Windows offered.
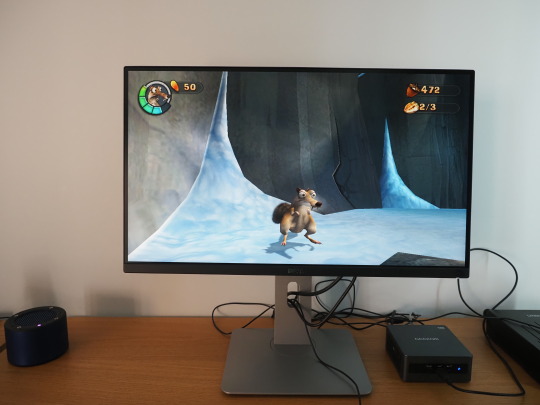
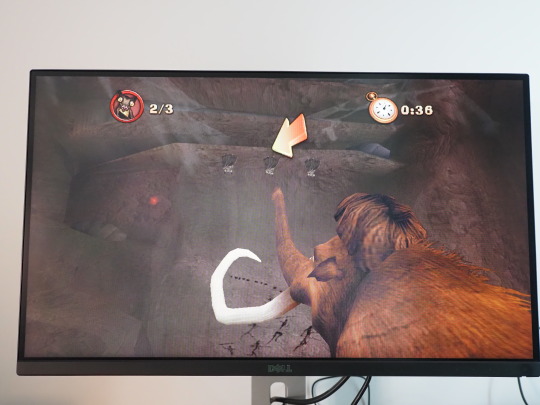
I tried again and successfully played the game up to the end of the Maelstrom level, completing this stage which in my opinion is the best level in the game! Here are the in-game pictures I took with the camera of some of the stages. I had to use HDR camera effect for some of the pictures. The levels shown in the pictures are the Waterpark, Forest, Ice River and Maelstrom.
I had to use my camera for the pictures as the game doesn't allow for print-screening due to Windows copy protection. When running Ice Age 2 in windowed mode, if you click out of the game it will darken the game screen and pause everything until you click on it again.
The game defaults to a screen resolution of 640x480, so I changed it to the maximum resolution of 1024x768. Interestingly the game didn't scale to full screen as when I tried it previously on another PC running Windows 10, but stretched to fit the screen instead. This was because of the 'Gaming Mode' function which is enabled in Windows 10. This mode is disabled by default in Windows 11 and the game worked perfectly without it. However, the game always runs in the 4.3 aspect ratio, but uses a fisheye lens effect which defaults to the 16.9 aspect ratio, so changing that fixed the gaming experience on this monitor. You can read more about display settings for the game in my write-up.
Audio played through my Mini-Rig Bluetooth speaker, which sounded great! The game uses a stereo sound set-up, which can act as surround through headphones.
Back in 2020, Dad gave me a copy of the Ice Age 2: The Meltdown video game which he found on eBay. I did a detailed review of the game and an unboxing review.
See my reviews in the links below:
There are a number of cheat codes you can enter in the pause menu, these include unlocking all the bonus content and the ability to unlock the 'Level Select' menu, plus more.
See all the cheat codes for the game here:
https://gamefaqs.gamespot.com/pc/931239-ice-age-2-the-meltdown/cheats
Playlist featuring all the levels:
https://www.youtube.com/playlist?list=PLyj4UFt4ma4_XQ0RZ3FjpFZAa7jvjhPc9
A link to the complete in-game music composed by Jim Croft:
https://www.youtube.com/playlist?list=PLO4jlmGoc6uDm0QVLyMqURTP2ciHWjCF_
Overall despite being 17 years old, running the game on Windows 11 worked a treat! It was great fun playing Ice Age 2: The Meltdown again as it is fun, humorous and challenging. Its music is memorable, vibrant and colourful just like its movie soundtrack!
However, I think that both Ice Age 2: The Meltdown (2006) and its Activision sequel Ice Age 3: Dawn of the Dinosaurs (2009) should be made available as a digital download through game distribution services such as Valves Steam alongside Ice Age: Scrat's Nutty Adventure (2019) to keep them running into the future without the need for a disc.
For a full list of all the Ice Age video-games see:
https://iceage.fandom.com/wiki/List_of_Ice_Age_video_games
See my video below. See videos underneath for the in-game bosses and also bosses in Scrat's Nutty Adventure on YouTube.
Scroll down to see my write-up on Cretaceous and Maelstrom!
5 notes
·
View notes
Text
How to Install and Set Up a Digital Water Flow Meter with Telemetry

A digital water flow meter with telemetry is a smart, efficient, and reliable solution for industries and utilities that require real-time flow monitoring, accurate data logging, and remote accessibility. Whether you’re working in water distribution, wastewater management, or industrial processing, installing this system properly is crucial for getting accurate readings and maximum performance.
In this step-by-step guide, we’ll explain how to install and set up a digital water flow meter with telemetry, with easy-to-follow instructions and expert tips.
✅ Step 1: Choose the Right Flow Meter Model
Before installation, identify:
The type of fluid (clean water, wastewater, chemicals, etc.)
The pipe diameter and material
Required flow rate range and accuracy
Environmental conditions (indoor, outdoor, high-temp, etc.)
📌 Tip: For most water infrastructure and industrial applications, an electromagnetic digital water flow meter with telemetry is ideal due to its accuracy and no-moving-parts design.
✅ Step 2: Select a Proper Installation Location
The performance of your digital water flow meter with telemetry heavily depends on correct placement.
Key guidelines:
Install on horizontal pipes with a full pipe condition
Maintain straight pipe lengths upstream (minimum 5×D) and downstream (3×D)
Avoid installing near valves, pumps, or elbows
Ensure the location is free from electrical interference
📌 Tip: If installing outdoors, use weatherproof enclosures and secure cable management for telemetry systems.
✅ Step 3: Mount the Flow Meter
Now it’s time to physically install the meter.
🔧 Installation Steps:
Shut off the water supply before cutting into the pipe.
Position the flow meter using flange or threaded fittings, based on the model.
Make sure the flow direction arrow on the meter aligns with actual flow.
Tighten bolts evenly to prevent leaks.
Ensure proper grounding, especially for electromagnetic flow meters.
📌 Tip: Always follow the manufacturer’s installation manual for model-specific instructions.
✅ Step 4: Connect the Telemetry System
Telemetry enables remote monitoring of flow data via GSM, GPRS, or IoT platforms.
📡 Telemetry Setup:
Connect the telemetry transmitter to the signal output of the flow meter.
Insert SIM card or configure Wi-Fi/Ethernet, depending on model.
Set parameters like data transmission intervals, reporting format, and alert triggers.
Test the signal strength and connectivity to ensure stable communication.
📌 Tip: Use a secure, cloud-based telemetry platform to view data from anywhere in real-time.
✅ Step 5: Configure and Calibrate the Flow Meter
Once physically installed, configure the meter through its digital display or remote dashboard.
⚙️ Configuration Includes:
Setting the pipe diameter and fluid type
Zeroing the meter (zero-flow calibration)
Configuring pulse output, 4–20mA analog signals, or MODBUS/RTU output
Checking and confirming flow accuracy
📌 Tip: Many advanced digital water flow meters with telemetry allow remote calibration and diagnostics, reducing the need for site visits.
✅ Step 6: Test and Validate the System
After setup, run a few test cycles to verify system performance:
Check live flow readings against manual measurements
Ensure telemetry data is being received on the cloud dashboard
Validate alarms and alert triggers
Document settings and baseline flow conditions
📌 Tip: Keep a record of all setup parameters for future reference and servicing.
🌟 Benefits of Using a Digital Water Flow Meter with Telemetry
📊 Real-time monitoring from remote locations
⚠️ Instant alerts for abnormal flow or system issues
🧠 Smart data logging and reporting
🛠️ Reduced maintenance with predictive insights
🌍 Ideal for smart cities, water boards, and industrial plants
🧾 Conclusion
Installing a digital water flow meter with telemetry may seem technical, but following the right steps ensures precise monitoring and hassle-free operation. It’s a game-changer for industries looking to embrace automation, efficiency, and smart water management.
For trusted and high-performance flow meters, Atlantech offers cutting-edge solutions backed by 30+ years of industry experience.
#digital flow meters#digital water flow meter#digital water flow meter manufacturer in india#electromagnetic flow meter manufacturers in india#digital water flow meter india#digital water meter#flow meters#electromagnetic water meter#electromagnetic flow meter suppliers in india
0 notes
Text
Maximizing ROI with Performance Max Campaigns

In the ever-evolving world of digital marketing, businesses are constantly seeking strategies to optimize their advertising efforts and achieve the highest return on investment (ROI). Performance Max campaigns, a powerful tool introduced by Google Ads, have emerged as a game-changer for advertisers aiming to maximize their reach and conversions across multiple channels. At Globose Technology Solutions Private Limited (GTS), we specialize in helping businesses harness the full potential of Performance Max campaigns to drive measurable results. In this blog, we’ll explore how these campaigns work, their benefits, and how GTS can help you maximize your ROI.
What Are Performance Max Campaigns?
Performance Max campaigns are a goal-based advertising solution offered by Google Ads that allows businesses to promote their products or services across all of Google’s advertising channels—including Search, Display, YouTube, Gmail, Discover, and Maps—from a single campaign. Powered by Google’s advanced machine learning, these campaigns optimize ad placements, bidding, and targeting in real time to deliver the best possible results based on your defined goals, such as maximizing conversions, increasing sales, or generating leads.
At GTS, we leverage our expertise in digital marketing and data analytics to design and manage Performance Max campaigns that align with your business objectives. Our team ensures that your campaigns are set up for success, delivering high ROI through strategic optimization.
Benefits of Performance Max Campaigns
Expanded Reach Across Channels: Performance Max campaigns enable you to reach audiences wherever they are on Google’s ecosystem. Whether your target audience is searching for a product, watching a YouTube video, or browsing Gmail, your ads will appear in the right place at the right time.
AI-Driven Optimization: Google’s machine learning algorithms analyze vast amounts of data to automatically adjust bids, target audiences, and ad formats. This ensures your budget is allocated to the most effective channels and audiences, maximizing conversions.
Simplified Campaign Management: Instead of managing separate campaigns for Search, Display, and Video, Performance Max consolidates everything into one campaign. This saves time and allows you to focus on strategy rather than micromanaging individual channels.
Improved Conversion Rates: By leveraging Google’s audience signals and intent data, Performance Max campaigns target users who are most likely to convert, whether they’re ready to purchase or just exploring options.
Dynamic Ad Creatives: Performance Max campaigns use asset-based advertising, where you provide text, images, and videos, and Google automatically creates ad variations tailored to each channel. This ensures your ads are always relevant and engaging.
How GTS Maximizes ROI with Performance Max Campaigns
At GTS, we take a data-driven approach to ensure your Performance Max campaigns deliver optimal results. Here’s how we do it:
Strategic Campaign Setup: We start by understanding your business goals, target audience, and key performance indicators (KPIs). Our team then configures your Performance Max campaign with the right conversion goals, budget, and audience signals to ensure a strong foundation.
Creative Asset Development: High-quality ad creatives are crucial for success. We design compelling visuals, write persuasive ad copy, and create engaging video assets that resonate with your audience across Google’s channels.
Data Analytics and Optimization: Using advanced analytics tools, we monitor your campaign performance in real time. We analyze metrics like click-through rates (CTR), conversion rates, and cost-per-acquisition (CPA) to identify opportunities for improvement and make data-backed adjustments.
Audience Segmentation: While Performance Max campaigns rely on Google’s AI for targeting, we enhance their effectiveness by providing detailed audience insights. For example, we can integrate first-party data or refine audience signals to ensure your ads reach the most relevant users.
Continuous Testing and Refinement: Digital marketing is not a set-it-and-forget-it process. We continuously test different ad variations, audiences, and bidding strategies to optimize performance and maximize ROI over time.
While Performance Max campaigns are a powerful tool for paid advertising, they work best when paired with other digital marketing strategies like email marketing automation. Discover how GTS helped a SaaS business achieve remarkable results with email marketing automation, which complemented their broader advertising efforts.
Real-World Impact
Imagine an e-commerce business aiming to boost online sales during the holiday season. By partnering with GTS, they launch a Performance Max campaign that promotes their products across Google Search, YouTube, and Display. Our team optimizes the campaign by targeting high-intent audiences, creating festive ad creatives, and adjusting bids to focus on peak shopping hours. The result? A 40% increase in conversions and a 25% reduction in CPA compared to their previous campaigns, leading to a significantly higher ROI.
0 notes
Text
CQ24-250A: High Current BMS for Demanding Applications
In today’s world of electric mobility, energy storage, and industrial power systems, the demand for efficient, reliable, and intelligent battery management has never been higher. Enter the CQ24-250A High Current BMS—a rugged, high-performance Battery Management System designed to handle the most demanding applications with precision and confidence.
What is the CQ24-250A?
The CQ24-250A is a Battery Management System (BMS) capable of managing up to 250 amps of continuous current. Built with high-grade components and advanced safety protocols, it ensures your battery pack operates efficiently while staying protected from common risks like overcharge, over-discharge, overcurrent, and thermal runaway.
Whether you're powering an electric vehicle (EV), an off-grid solar system, or an industrial-grade UPS, this BMS offers the stability and intelligence required for mission-critical operations.
Key Features at a Glance
🔋 250A Continuous Current Handling Perfect for high-discharge applications like EVs, e-bikes, forklifts, and heavy equipment.
🛡️ Advanced Safety Protections Overvoltage, undervoltage, overcurrent, short circuit, and temperature protection ensure battery longevity and user safety.
🧠 Smart Monitoring and Communication Many CQ24-250A models include CAN Bus or UART support, enabling real-time data feedback to external devices like dashboards, apps, or BMS controllers.
🔧 Modular and Scalable Ideal for use in both small and large battery packs, the system is flexible for 24V, 48V, 72V, and even higher-voltage configurations.
🌡️ Built-In Temperature Sensors Keeps tabs on thermal performance to avoid overheating and cell imbalance.
Why Choose a High Current BMS?
In high-performance systems, current spikes and load variations are normal. A low-quality BMS can choke your power output or, worse, fail catastrophically. The CQ24-250A is engineered to maximize energy flow while keeping your cells safe and balanced—even under high-stress conditions.
This is especially critical in:
Electric Vehicles (EVs)
Battery Energy Storage Systems (BESS)
Power Tools & Robotics
Marine & RV Power Solutions
Solar Off-Grid Inverters
Applications in the Real World
⚡ Electric Vehicles
The CQ24-250A enables seamless power delivery to motors, even during acceleration and regenerative braking, making it ideal for e-cars, e-bikes, and utility EVs.
☀️ Solar Energy Systems
In solar battery banks, this BMS ensures the batteries are charged optimally, protecting them from over-discharge during long cloudy periods or high consumption loads.
🏭 Industrial Power
In forklifts or mobile power stations, the BMS provides rugged performance with minimal downtime.
Installation and Compatibility
Most CQ24-250A BMS units are user-friendly and come with:
Clear wiring diagrams
Communication ports for data display
Configurable parameters for battery chemistry (LiFePO4, NMC, LTO, etc.)
Before installation, always verify compatibility with your battery pack's voltage, cell configuration, and chemistry.
Conclusion: Power with Protection
The CQ24-250A High Current BMS is not just a component—it’s a power guardian. As power systems grow in complexity and performance demands, choosing the right BMS becomes a strategic decision. With its robust design and smart features, the CQ24-250A stands as a dependable solution for any high-current, high-performance battery application.
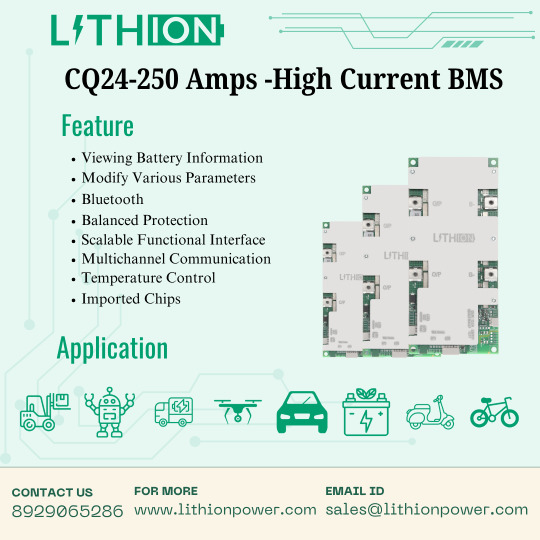
#lithium battery#batterymanagementsystem#lithion power#battery management system#bms#ev#lithion#electricvehicle#lithionpower
0 notes
Text
The Ultimate Guide to Choosing the Best Touch Screen Laptop for Your Needs
In today's fast-paced digital world, Best Touch Screen Laptop have become essential tools for professionals, students, and creatives alike. Their versatility, combined with the convenience of touch input, makes them ideal for a variety of tasks. Among the top contenders in this category is the Acer Spin series, known for its innovative design and performance.
Why Choose a Touch Screen Laptop?
Enhanced Productivity: Touchscreen laptops allow for intuitive interactions, enabling users to navigate, annotate, and create with ease.
Versatility: Devices like the Acer Spin series offer 2-in-1 functionality, allowing users to switch between laptop and tablet modes seamlessly.
Portability: Lightweight designs ensure that you can work or study on the go without any hassle.
Introducing the Acer Spin Series
The Acer Spin series stands out in the touchscreen laptop market, offering a blend of performance, design, and affordability. Let's delve into some of its notable models:
1. Acer Aspire 3 Spin 14 Intel Core i3-N305

Display: 14-inch WUXGA (1920 x 1200) IPS multi-touch display with stylus support
Processor: Intel Core i3-N305
Memory & Storage: 8 GB RAM, 512 GB SSD
Graphics: Intel UHD Graphics
Color: Pure Silver
Weight: 1.54 kg
Price: ₹42,999 (inclusive of all taxes)
Click Here to Shop now
This model is perfect for students and professionals seeking a reliable device for everyday tasks.
2. Acer Chromebook Plus Spin 714

Display: 14-inch WUXGA (1920 x 1200) IPS touch display
Processor: Intel Core i3-1315U
Memory & Storage: 8 GB RAM, 128 GB SSD
Graphics: Intel UHD Graphics
Color: Silver
Weight: 1.37 kg
Operating System: Chrome OS
Click Here to Shop now
Ideal for users who primarily work online and prefer the simplicity and speed of Chrome OS.
Factors to Consider When Choosing a Touch Screen Laptop
Display Quality: Ensure the laptop has a high-resolution display for crisp visuals.
Performance: Depending on your tasks, choose a processor and RAM configuration that meets your needs.
Battery Life: Look for laptops that offer long battery life to support extended use.
Portability: If you're always on the move, a lightweight and compact design is crucial.
Budget: Determine your budget and find a model that offers the best features within that range.
Conclusion
Touch screen laptops, especially the Acer Spin series, offer a blend of functionality and convenience, making them suitable for a wide range of users. Whether you're a student, professional, or creative, there's a model tailored to your needs. Explore the full range and find the perfect touchscreen laptop for you.
#acer india#laptop#acer#acer laptop#monitor#desktop#online store#chromebook#gaming laptop#best touch screen laptop#Touch Screen Laptop#Touch Screen Laptop Price#Store Acer
0 notes
Text
QR Menu Maker Nulled Script 4.0.0

Download QR Menu Maker Nulled Script – Create Contactless Menus with Ease Looking to digitize your restaurant menu in a sleek, efficient, and modern way? Look no further. The QR Menu Maker Nulled Script is the ultimate solution for restaurants, cafés, bars, and food trucks that want to offer a contactless dining experience. This script is now available for free download on our website—no hidden charges, no restrictions. What is QR Menu Maker Nulled Script? The QR Menu Maker Nulled Script is a full-featured SaaS solution that empowers you to create beautiful, interactive QR-based menus for restaurants and eateries. With this script, business owners can easily generate dynamic QR codes that lead customers directly to their digital menu, ensuring a safer and more hygienic dining experience. It’s the perfect tool for adapting to post-pandemic consumer expectations and providing a seamless service environment. Technical Specifications Script Type: PHP (SaaS) Database: MySQL Frontend: HTML5, Bootstrap 4 QR Code Engine: Integrated dynamic QR code generator Multilingual Support: Yes License: Nulled version available for free download Features and Benefits of QR Menu Maker Nulled Script Designed with innovation in mind, the QR Menu Maker Nulled Script offers a comprehensive set of features that not only enhance customer experience but also streamline operations for business owners. 1. Dynamic QR Code Generation Create unique QR codes for each menu or restaurant branch with just a few clicks. The codes can be scanned using any mobile device, redirecting the user to a fully responsive digital menu. 2. Fully Customizable Menus Organize food items, beverages, and specials into neatly categorized menus with image support, pricing, and descriptions. No coding knowledge required! 3. SaaS-Ready Model This script comes with a built-in subscription and plan management system, enabling you to launch your own SaaS platform with ease. You can monetize your menu-making service effortlessly. 4. User-Friendly Admin Panel The intuitive admin dashboard offers complete control over menu content, QR codes, user subscriptions, and payment integrations. 5. Responsive & Mobile-Optimized Your digital menus will look stunning on all devices—be it smartphones, tablets, or desktops. The responsive design ensures optimal viewing across all screen sizes. Common Use Cases Restaurants and Cafés: Provide digital menus accessible via QR codes placed on tables or walls. Food Trucks: Share menus with customers through social media or printed QR flyers. Hotels: Replace in-room dining menus with contactless digital alternatives. Bars and Lounges: Display drinks and cocktails on a stylish, interactive platform. How to Install and Use Download the QR Menu Maker Nulled Script from our website. Upload the files to your web server via FTP or file manager. Set up the database and update the configuration file with your credentials. Run the installation wizard to complete the setup process. Log in to the admin panel and start creating your first menu! Frequently Asked Questions (FAQs) Is the QR Menu Maker Nulled Script safe to use? Yes, the nulled version we provide is tested and clean from malware. However, always back up your website before installing any third-party scripts. Can I use this script to start my own SaaS business? Absolutely! This script is designed with multi-user and SaaS functionality in mind, making it perfect for reselling or subscription-based platforms. Do I need programming skills to use this script? Not at all. The user-friendly interface ensures that even non-technical users can create and manage QR-based menus easily. Why Choose Our Website? We’re dedicated to helping developers and business owners access the tools they need without spending a fortune. Our repository of high-quality nulled scripts, including the QR Menu Maker Nulled Script, is curated, tested, and updated regularly to ensure top-notch performance and usability.
Don’t forget to check out other valuable tools like Yoast seo nulled to further enhance your WordPress site’s performance. For advanced visual editing and animation tools, explore the power of Slider Revolution NULLED to bring your digital menus to life. Conclusion The QR Menu Maker is more than just a digital menu builder—it’s a complete platform for restaurants and entrepreneurs who want to stay ahead of the curve. Download it now from our website and elevate your service experience with a professional, contactless menu system that your customers will love.
0 notes
Text
Costa Power Industries Pvt. Ltd. is a having global exposure as Suppliers, Distributor and dealers of Precision cooling system, Precision cooling system supplies, Precision cooling in Control rooms, Precision cooling System distributor in Mumbai, Precision cooling System dealers in Mumbai. As headquarter is in economic capital of India, located in Mumbai and branches at PAN India. Costa Power Industries Pvt. Ltd. had started its operation in the field Since years successfully offering turnkey project services in the field of Electrical, Automation, Instrumentation, Energy Saving and Control with qualified & experience working team with solid technical background.
Costa Power Industries Pvt. Ltd. always looking and recommends to client precision cooling system rather than normal cooling equipment's. Precision cooling is an air conditioning or cooling technology which is designed for use in IT equipment's and is implemented in devices that directly cool electronic and industrial machinery, server room, data centers and ups system. This system has better air filtration capabilities. Costa power is best supplier for precision cooling in Mumbai with advanced humidity control mechanisms than standard cooling techniques.
We offer solution for precision cooling in Mumbai and India which helps to control and manage air flow for indoor IT devices and equipment's. Moreover a precision cooling system supplier can be managed through software and programmatic access. Precision cooling allows IT managers to control the temperature, humidity and air flow in an IT environment. Besides environmental and device cooling, precision cooling also assists in removing internal heat generated from computers and equipment. A precision cooling system in Mumbai vents out all the heat to maintain a balanced, sensible heat ratio, such as dynamically adjusted cooling in relation to the heat in or temperature of the device/environment
Precision cooling system unitscan be installed in a modular rack design, which enables quick configuration and is readily expandable by load. Data center cooling by water is safe for the equipment it protects due in part to built-in leakage detectors, which can display leaks and offer alerts in a timely manner. With manual dehumidification capacity, Costa provides data center Precision cooling system offers a rapid and precise means of adjusting the level of moisture within the air, and keeping humidity levels within the ideal range required by the data center equipment
#costapower#upsdealers#upsbatterydistributor#upsbatterysuppliers#upsbattery#bestups#bestbattery#upsamc#pricisioncooling
0 notes
Text
Gaming Monitors in Sri Lanka: Level Up Your Visual Experience

Hey gamers! Are you still playing your favorite titles on a regular office monitor? If so, you might be missing out on a truly immersive gaming experience. A dedicated gaming monitor can transform your gameplay with faster response times, higher refresh rates, and better color accuracy. Let's dive into the world of gaming monitors available at Suhadha Computer Center, one of Sri Lanka's trusted retailers for gaming hardware.
Why Do You Need a Gaming Monitor?
Before we look at specific options, let's understand what makes gaming monitors special:
Higher Refresh Rates
Standard monitors typically operate at 60Hz, meaning they refresh the image 60 times per second. Gaming monitors offer 144Hz,, 165Hz, or even 240Hz, resulting in smoother motion and reduced motion blur – crucial for fast-paced games.
Lower Response Times
Response time measures how quickly a pixel can change from one color to another. Gaming monitors boast response times as low as 1ms, eliminating ghosting and blurring during rapid movements in games.
Adaptive Sync Technologies
Technologies like AMD FreeSync and NVIDIA G-Sync synchronize your monitor's refresh rate with your graphics card's frame rate, eliminating screen tearing and stuttering for a smoother gaming experience.
Gaming Monitor Options at Suhadha
Suhadha Computer Center offers a variety of gaming monitors to suit different budgets and requirements:
Entry-Level Gaming Monitors (Rs.34,000 - Rs.45,000)
Perfect for casual gamers or those on a budget, these monitors typically offer:
24-27 inch display size
Full HD (1920x1080) resolution
75-144Hz refresh rates
1-5ms response times
Basic adaptive sync features
These monitors are ideal for esports titles like CS
, Valorant, or League of Legends, where high framerates matter more than visual fidelity.
Mid-Range Gaming Monitors (Rs.45,000 - Rs.100,000)
These offer a better balance between performance and visual quality:
27-32 inch display size
WQHD (2560x1440) resolution
144-165Hz refresh rates
1ms response times
Advanced adaptive sync features
Better color accuracy
Mid-range monitors are versatile enough for both competitive gaming and visually stunning single-player titles.
High-End Gaming Monitors (Rs.100,000+)
For enthusiasts and professional gamers, premium monitors like the models priced at Rs.120,000 or the ones that go up to Rs.202,900 offer:
27-34 inch display size
WQHD or 4K resolution
240Hz+ refresh rates
Advanced panel technologies (IPS, VA with better color reproduction)
HDR support
Premium build quality and features
These monitors deliver the ultimate gaming experience with no compromises.
Panel Types: What's the Difference?
When browsing Suhadha's collection, you'll encounter different panel technologies:
TN Panels
Fastest response times (ideal for competitive gaming)
Lower cost
Limited viewing angles and color reproduction
VA Panels
Better contrast ratios for deeper blacks
Good color reproduction
Slightly slower response times than TN
IPS Panels
Best color accuracy and viewing angles
Higher-end IPS panels now offer competitive response times
Usually more expensive
Additional Features to Consider
When choosing a gaming monitor from Suhadha's collection, also consider:
Connectivity: Ensure the monitor has the right ports (HDMI, DisplayPort) for your setup
Adjustability: Height-adjustable stands prevent neck strain during long gaming sessions
Screen size: Larger isn't always better; competitive gamers often prefer 24-27 inches to keep everything in their field of view
Aspect ratio: Standard 16:9 or ultrawide 21:9 for more immersive experiences
Setting Up Your Gaming Monitor
Once you've purchased your gaming monitor from Suhadha, make sure to:
Configure the refresh rate in your display settings
Enable adaptive sync technologies
Use the correct cable type (DisplayPort is preferred for higher refresh rates)
Adjust the monitor's color settings for optimal gaming visuals
Why Choose Suhadha Computer Center?
Suhadha Computer Center offers several advantages when shopping for gaming monitors:
They provide genuine products with manufacturer warranties
Their staff can help you choose a monitor that matches your GPU capabilities
Competitive pricing on a wide range of models
After-sales support if you encounter any issues
Final Thoughts
A quality gaming monitor is an investment that can significantly enhance your gaming experience. Whether you're a casual player or a competitive gamer, Suhadha Computer Center has options to match your needs and budget.
Ready to level up your gaming setup? Check out Suhadha's gaming monitor collection and find the perfect display to complement your gaming rig!
1 note
·
View note
Text
How to Set Up a Digital Standee for Maximum Impact

Overview
Businesses are always looking for new and creative ways to draw in clients in the fast-paced digital world of today. A dynamic and eye-catching way to present critical information, brand messages, or promotional content is using a digital standee. However, smart placement and appropriate configuration are essential to maximising its potential. To make your brand stand out in any situation, we'll look at how to build up a digital standee in this post.
1. Recognise Your Digital Standee's Objective
It's crucial to specify the goal of a digital standee before putting it up. Are you utilising it to give directions at an event, advertise a new service, or promote a product? You can choose the best area and create relevant material with the aid of a well defined purpose. Your digital standee should have a specific purpose that complements your overarching communication or marketing plan.
2. Pick the Proper Site
For a digital standee to be effective, placement is essential. It ought to be placed in places with lots of foot traffic so that it is clearly visible and can immediately attract attention. The best locations are retail store aisles, event spaces, reception rooms, and entrances. Make sure there are no physical impediments or other distractions surrounding the standee so that viewers can see the information.
3. Produce Dynamic and Captivating Content
Your digital standee should have entertaining, educational, and visually appealing material. Make use of bold typefaces, vivid colours that complement your brand, and high-resolution photos. Adding brief looping films or motion graphics can greatly improve the standee's attractiveness. To make your argument to onlookers immediately, keep your messages succinct and powerful.
4. Assure Easy Accessibility and Technical Readiness
A digital standee needs to be simple to use and keep up. Verify that it supports a variety of media types and offers remote content management capabilities if necessary. Make sure you have a steady internet connection and a dependable power source (if needed for real-time updates). Prior to any public presentation, test the display to assist prevent any technical issues that can damage the reputation of your company.
5. Track Performance and Make Regular Updates
Keep an eye on your digital standee's performance to get the most out of it. Tools that monitor viewer interaction or engagement (if touch-enabled) can reveal the most effective material. Make frequent updates to your material to reflect events, promotions, and branding modifications. While new information keeps people interested, a static message eventually loses its impact.
In conclusion
The proper setup of a digital standee can greatly improve your marketing initiatives. Every element of the standee, from technical dependability to creative content and strategic placement, adds to its impact. When done properly, it turns into a potent weapon that not only draws in viewers but also encourages interaction and effectively and stylishly conveys your message.
0 notes
Text
Stay Connected Across Time Zones: How to Set Up Dual Clocks on Your Android Device
In our increasingly globalized world, keeping track of multiple time zones is essential. Whether you're coordinating with international colleagues, staying in touch with family abroad, or managing travel schedules, having dual clocks on your Android device can be incredibly helpful.
🕒 What Is the Dual Clock Feature?
The dual clock feature allows you to display two different time zones simultaneously on your device's lock screen or home screen. This ensures you're always aware of the local time and another time zone of your choice, eliminating the need to constantly calculate time differences.
📱 How to Enable Dual Clocks on Android
The process to set up dual clocks can vary depending on your device's manufacturer and Android version. Here's a general guide:
Access Lock Screen Settings: Go to Settings > Lock Screen or Lock Screen & Security.
Select Clock Style: Tap on Clock Style or a similar option.
Enable Dual Clock: Look for the Dual Clock or Roaming Clock option and toggle it on.
Set Home Time Zone: Choose your home time zone.
Choose Second Time Zone: Select the additional time zone you wish to display.
On Samsung devices, for instance, you can navigate to Settings > Lock Screen > Roaming Clock to set your home time zone and enable dual clocks.
🏠 Displaying Dual Clocks on the Home Screen
If you prefer to have dual clocks on your home screen:
Add a Clock Widget: Long-press on an empty area of your home screen and select Widgets.
Choose a Clock Widget: Scroll to find the Clock widget.
Select World Clock: Some devices offer a World Clock widget that allows multiple time zones.
Place the Widget: Drag and drop the widget onto your home screen.
Configure Time Zones: Tap on the widget to add or modify the time zones displayed.
For devices without a built-in dual clock widget, third-party apps like the "Dual Clock Widget" are available on the Google Play Store.
🔄 Synchronizing Time Zones
Ensure your device's time settings are accurate:
Automatic Time Zone: Enable automatic time zone updates by going to Settings > Date & Time > Automatic Time Zone.
Manual Adjustment: If needed, manually set your desired time zones in the same menu.
💡 Tips for Effective Use
Traveling Abroad: When traveling, the dual clock feature helps you keep track of your home time zone.
Work Coordination: For international teams, displaying colleagues' time zones can aid in scheduling meetings.
Family Connections: Stay connected with family members in different parts of the world by always knowing their local time.
By setting up dual clocks on your Android device, you can effortlessly manage multiple time zones, enhancing communication and organization in our interconnected world.
1 note
·
View note
Text
Decoding the Numbers: What a Truck Compliance Plate Reveals About Your Vehicle

For many truck owners, the compliance plate is just a shiny piece of metal tucked away on the chassis or firewall. But this small plate holds critical information that determines a truck’s roadworthiness, legality, and compliance with national safety standards. Understanding what a truck compliance plate reveals is not only important for staying within the law—it’s also key to maintaining the long-term health and value of your vehicle.
Whether you’re restoring a vintage workhorse or modifying a modern rig, decoding the compliance plate may save you from unexpected penalties, safety issues, or mechanical mismatches.
What Is a Truck Compliance Plate?
A truck compliance plate is a metal tag affixed to a commercial vehicle, usually riveted in an easily accessible location such as the engine bay, inside the driver’s door frame, or on the chassis. It’s issued when a vehicle meets the Australian Design Rules (ADRs), which are national standards governing safety, emissions, and construction.
Each plate carries a set of technical details that define how the truck may be legally operated. It’s not just a bureaucratic formality—this plate is a key legal identifier that enables registration, insurance, and resale.
If you’re curious about how different builders and restorers document their compliance projects, check out visual communities like #australiantrucks or #truckmod on Tumblr for visual inspiration and shared experiences from across the country.
Breaking Down the Plate – What Each Number Means
While it may look like a confusing collection of codes and acronyms, a truck compliance plate is highly structured. Each part serves a purpose:
Manufacturer and Model: Identifies who built the truck and what series or variant it is.
Build Date and Compliance Date: These two dates are not always the same. The build date refers to when the truck was constructed, while the compliance date confirms when it passed inspection and received approval under ADRs.
Vehicle Identification Number (VIN): A unique 17-character code that traces the identity of the truck throughout its life.
GVM and Tare Weight: The Gross Vehicle Mass (GVM) defines the maximum weight the truck may legally carry, including the vehicle’s own mass, passengers, fuel, and cargo. Tare weight refers to the unladen weight of the vehicle.
Seating Capacity and Axle Configuration: Especially important for heavy-duty trucks, these details influence licensing requirements and road usage classifications.
ADR Codes: These shorthand codes reference the exact ADRs that the truck complies with—covering areas such as braking systems, lighting, emissions, and structural integrity.
Decoding these elements may help you determine if your truck is suited for towing, long-haul trips, or if it's eligible for certain modifications or upgrades.
Why It Matters – Legal, Safety & Practical Implications
Operating a truck without a compliant or correctly filled-in compliance plate isn’t just risky—it’s illegal. In Australia, failure to have a valid plate, or displaying one that doesn’t reflect the truck’s current condition, may result in fines, registration refusal, or worse—being issued a defect notice during a roadside inspection.
More importantly, a mismatch in compliance details may endanger drivers and other road users. For example, exceeding the stated GVM may lead to axle stress, brake failure, or compromised handling. Incorrect or missing data also complicates insurance claims, reducing payout eligibility after an incident.
To avoid such complications, many transport operators turn to specialist truck compliance plate services to ensure all documentation is accurate, approved, and up to date.
When You May Need a New or Replacement Compliance Plate
There are a few common scenarios where replacing or updating a truck compliance plate becomes necessary:
After Major Modifications: Any structural change—such as engine swaps, chassis extensions, or axle reconfigurations—requires re-certification to reflect the new specifications.
Imported Trucks: Vehicles brought in from overseas must be retrofitted with a local compliance plate after passing relevant tests.
Lost or Damaged Plate: In cases of corrosion, theft, or accident damage, the original plate may no longer be legible or present.
Each of these situations involves engineering sign-off, sometimes from a Registered Automotive Engineer (RAE), and must follow national and state-based regulations.
As seen on many builds featured under tags like #custombuild or #mechaniclife, compliance isn’t just a box to tick—it’s an integral part of responsible vehicle customisation.
How to Verify the Authenticity of a Truck Compliance Plate
Unfortunately, not every compliance plate out there is genuine. With the second-hand market booming and DIY modifications on the rise, it’s critical to verify a plate’s legitimacy:
Check the VIN: Ensure it matches the chassis and is correctly registered.
Inspect for Tampering: Genuine plates are cleanly riveted and etched using industry-grade methods. Be wary of plates that look engraved by hand, show irregular fonts, or have scratch marks around the fasteners.
Consult a Professional: If you’re ever in doubt, consulting qualified engineers or using verified truck compliance plate services is the best way to ensure full legal alignment and engineering certification.
Know Your Plate, Know Your Truck
The humble truck compliance plate may be small, but its importance is massive. It’s more than a metal tag—it’s a statement of legal readiness, road safety, and engineering integrity. Whether you’re upgrading your fleet, restoring a classic, or preparing for inspection, take the time to decode your compliance plate. You may discover more about your vehicle than you realised—and avoid costly missteps in the process.
If you need expert help navigating the compliance process, Stewart & Sons Engineering offers dependable truck compliance plate services that support everything from inspection to certification and reissuance.
0 notes
Text
Beginner’s Guide to Ethical Hacking Tools 🔐
Ethical hacking is more than a buzzword—it’s a critical skillset in 2025’s cybersecurity landscape. If you’ve ever wondered how hackers think and how companies stay one step ahead of cybercriminals, you need to know the essential tools of the trade. Here’s your beginner’s toolkit:
1. Kali Linux – The Hacker’s Operating System
A Linux distribution packed with security and penetration-testing tools.
Why use it? Pre-installed tools, live-boot capability, regular updates.
Get started: Download the ISO, create a bootable USB, and explore tools like Nmap and Metasploit.
2. Nmap – Network Mapper
Scans networks to discover hosts, services, and vulnerabilities.
bash
CopyEdit
nmap -sS -sV -O target_ip
-sS for stealth scan
-sV to detect service versions
-O for OS detection
3. Metasploit Framework – Exploitation Powerhouse
Automates exploiting known vulnerabilities.
Use case: After identifying an open port with Nmap, launch an exploit module in Metasploit to test the weakness.
Basic commands: bashCopyEditmsfconsole use exploit/windows/smb/ms17_010_eternalblue set RHOST target_ip run
4. Wireshark – Packet Analyzer
Captures and analyzes network traffic in real time.
Why it matters: See exactly what data is flowing across the network—useful for finding unencrypted credentials.
Tip: Apply display filters like http or ftp to focus on specific protocols.
5. Burp Suite – Web Application Scanner
Interacts with web applications to find vulnerabilities (SQLi, XSS, CSRF).
Features: Proxy traffic, automated scanner, intruder for fuzzing.
Getting started: Configure your browser to use Burp’s proxy, then browse the target site to capture requests.
6. John the Ripper – Password Cracker
Tests password strength by performing dictionary and brute-force attacks.
bash
CopyEdit
john --wordlist=/usr/share/wordlists/rockyou.txt hashfile.txt
Tip: Always test on hashes you have permission to crack.
7. Nikto – Web Server Scanner
Checks web servers for dangerous files, outdated software, and misconfigurations.
bash
CopyEdit
nikto -h http://target_website
Quick win: Identify default files and known vulnerabilities in seconds.
8. Aircrack-ng – Wireless Network Auditor
Assesses Wi-Fi network security by capturing and cracking WEP/WPA-PSK keys.
Workflow:
airodump-ng to capture packets
airmon-ng to enable monitor mode
aircrack-ng to crack the handshake
9. OWASP ZAP – Web Vulnerability Scanner
An open-source alternative to Burp Suite with active community support.
Use case: Automated scans plus manual testing of web applications.
Bonus: Integrated API for custom scripting.
10. Hydra – Fast Login Cracker
Performs rapid brute-force attacks on network and web services.
bash
CopyEdit
hydra -l admin -P passwords.txt ssh://target_ip
Warning: Use only in lab environments or with explicit permission.
Putting It into Practice
Set up a lab with virtual machines (Kali Linux + victim OS).
Scan the network with Nmap.
Analyze traffic in Wireshark.
Exploit a vulnerability with Metasploit.
Validate web app security using Burp Suite and OWASP ZAP.
Crack test passwords with John the Ripper and Hydra.
Ready to Dive Deeper?
If you’re serious about ethical hacking, check out our Ethical Hacking Course in Jodhpur at TechFly (no link here per your request). You’ll get hands-on labs, expert mentorship, and real-world attack/defense scenarios.
1 note
·
View note